Screenshots
See it in action
A clean two-step UI — configure clearances, then review results. No complex setup, no manual element selection.
Wall Sleeve Cuts scans your linked MEP model, detects every duct, pipe, and cable tray that crosses a wall, then places a dimensioned sleeve family, cuts the wall, and generates a fully populated schedule — all in one click.
Wall Sleeve Cuts handles the full sleeve workflow — detection, placement, wall cutting, marking, and scheduling — without a single manual step.
Every duct, pipe, and cable tray in the linked MEP model is tested against every wall face using precise geometric intersection — no manual selection, no misses.
Placed sleeves cut their host walls automatically using Revit's void geometry API. The opening is visible immediately in the 3D view — no separate step required.
Each sleeve receives a unique Mark value that encodes the service type and MEP system name — making sleeves easy to identify, filter, and coordinate across disciplines.
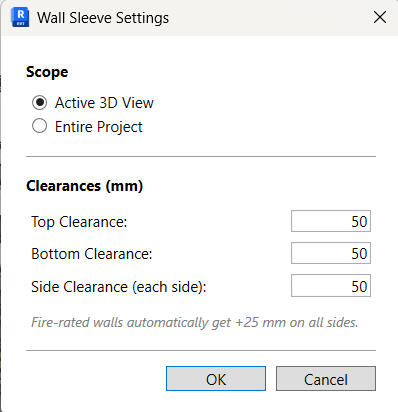
Set top, bottom, and side clearances in millimetres before each run. Fire-rated walls automatically receive an additional clearance margin. Cable trays use asymmetric clearances.
A Wall Sleeve Schedule is created automatically. Every sleeve is tagged with service type, system name, linked model, dimensions, clearances, and host wall ID — ready for coordination.
If the project has multiple linked models, a clear dialog lists all loaded links so you can choose the MEP model without clicking elements in the viewport.
Run on the entire project or limit to the currently active 3D view — useful for checking individual levels or running on a sub-set of walls during coordination.
If ducts or pipes have insulation applied in the linked model, the sleeve dimensions automatically account for it — the sleeve width and height include the insulation thickness.
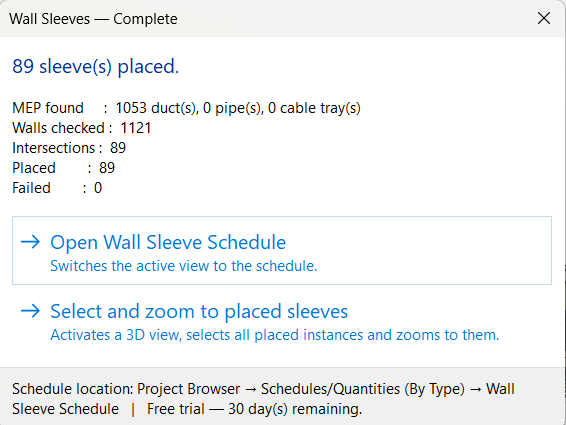
After each run, choose to zoom directly to all placed sleeves in your 3D view, or open the Wall Sleeve Schedule — both accessible from a single post-run dialog.
From your architectural model with a linked MEP model to a fully coordinated sleeve set — in under a minute.
Enter top, bottom, and side clearances in mm. Choose Active 3D View to process only visible walls, or Entire Project for a full run.
If multiple linked models are loaded, a dialog lists them all. Select the MEP model. If only one link is loaded, it is selected automatically.
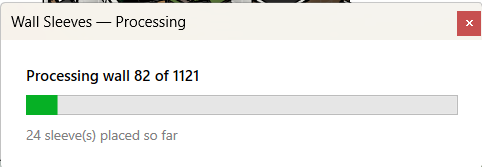
A live progress bar shows wall-by-wall processing. Intersections are detected geometrically. Sleeves are placed, dimensioned, marked, and walls are cut in one transaction.
The summary dialog shows exactly how many sleeves were placed. Open the Wall Sleeve Schedule, or zoom directly to placed instances in your 3D view — your choice.
A clean two-step UI — configure clearances, then review results. No complex setup, no manual element selection.
Start with a full-featured 30-day trial — no credit card, no email required. Upgrade to a permanent licence whenever you like.
30 days · No credit card needed
One user · Revit 2025 & 2026